all challenges foodie design teams digital hybrid tutorials xyz
"For my thoughts are not your thoughts, neither are your ways my ways, saith the Lord. For as the heavens are higher than the earth, so are my ways higher than your ways, and my thoughts than your thoughts. For as the rain cometh down, and the snow from heaven, and returneth not thither, but watereth the earth, and maketh it bring forth and bud, that it may give seed to the sower, and bread to the eater: So shall my word be that goeth forth out of my mouth: it shall not return unto me void, but it shall accomplish that which I please, and it shall prosper in the thing whereto I sent it." ~ Isaiah 55: 8-11

8.31.2014

DIY Quilted Canvas Wall Decor / Pixels and Co...


Hello!  Here's a hybrid tutorial I posted over at Pixels and Company today. I love little “artsy” things, especially little canvases. I have a tutorial today that will show you how to make this little quilted canvas wall decor. It would make such a cute little gift, don’t you think?
What you’ll need…
  • Digital kit & print outs – I used a kit from KimB’s Designs,  Best Medecine
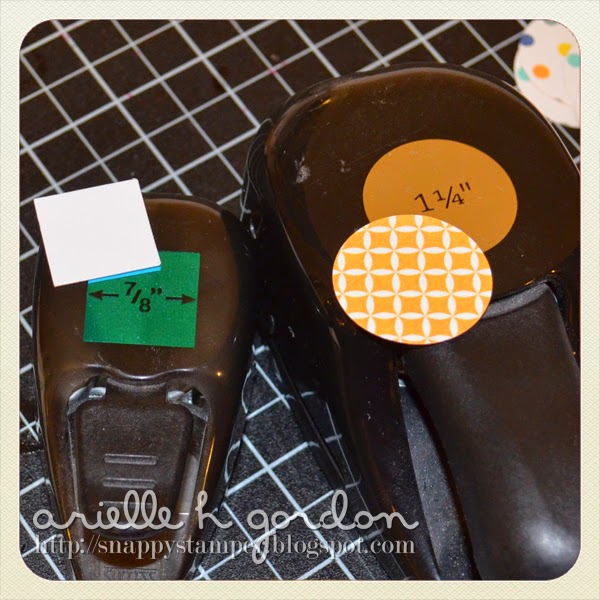
  • Square punch 7/8″ of thick card stock (to use as a template)
  • Circle punch 1 1/4″
  • 4×4″ canvas
  • Buttons or other embellishments
  • Modge Podge
  • paint brushes and paint (optional)
  • washi tape (optional)

Step 1 – Set up your digital prints. I set up a document of my patterned papers in long strips, at least 2 1/8″. I set up an identical page with solid colors, the printed one of each back-to-back. That way my circles would be solid on one side and patterned on the other. I also set up and printed a sentiment and coordinating strip of patterned paper, about 2 1/2 long.


Step 2 – Punch a piece of heavy card stock with the square 7/8″ punch. You will use this as a template to fold your circles. You will need to punch out 13 circles.

Step 3 – Place the square template into the center of each circle and fold the edges over.


Step 4 – Arrange the squares prior to adhering them to you canvas. As you’ll notice, I painted the top of my canvas yellow, but left the sides unpainted. In arranging your squares, remember to plan in a space of 3 consecutive squares, to add your sentiment.

Step 5 – Apply Modge Podge to the back of each square and adhere to the canvas. I adhere the first square to the top left corner, flush with the top and left side. Then I apply the the one assigned to the top right corner, flush with the top and right side. Once they are in place, I can add the middle 2, making sure to space them appropriately. Then adhere the rest.


Step 6 - Apply your sentiment to the empty space and add buttons or other embellishments.

Step 7 - You can see I finished the side with color-coordinating washi tape.


And that’s it – a fun little wall canvas! If you make one of your own, please add a photo of it to the hybrid gallery over at Pixels and Company, and come back and leave a link in the comments – I would love to see it!

Have a great day,

8.30.2014

SMILE / RS #130...


Hello! How was your Saturday? We spent the day doing chores - it was great! I also met my mom at the gym for an hour and then we went for a coffee afterward. Also G-R-E-A-T! My mom and I spend a lot of time together, coming and going. Maybe not long stretches, but bits at least every other day. She is a real special lady! One of the most giving people I know. And very thoughtful. I love her a lot!

Anyway, my card today is for RetroSketches - I love this fun sketch by Erin! I used a die from Little Yellow Bicycle, but I swear I can't find where I bought it! Sorry!


Big hugs,


8.28.2014

HELLO / DS #166...


Good morning! How are you? With the kids in school, I started back at the "Y" with some classes, I did a cardio/weight training class this morning after I dropped the kids off. Whew! It was quite a butt-kicker - LOL! Anyways, I got up at super early hoping to get my card posted, but the kids made sure I spent every minute trying to get them in gear, so I wasn't able to. I swear Maisie takes 40 minutes to eat a small bowl of cereal... any ideas on getting her to speed up? I've tried a timer, but then she just doesn't eat. I'm at a loss.

Anyhoo - we have a FUN new sketch over at The Deconstructed Sketch challenge today, you should try it! I used my FAVE Papertrey Ink set these days, Wet Paint. I just love this set paired with some funky papers!


Be sure to to play along and check out all the other ladies wonderful inspiration this week! 


Have an amazing day!

8.26.2014

THINKING OF YOU / CQC #256...


Hiya! It's Tuesday and that means a brand new color palette over at the colourQ! WOOHOO! I thought the inspiration was pretty funky, so I decided to get a little funky myself. After doing all the stamping and embossing, my card still wasn't sitting well with me, so I pulled out some Copics and added the faux "splatters". It really livened it up! The set is from Pink Paislee - Pen Pals, what a fun little set!


Have an awesome day!

8.25.2014

HELLO / Papertrey Ink Blog Hop...


Hello! I am JUST squeeking in with an entry into this month's Papertrey Ink Blog Hop! I loved loved loved the inspiration this month, so glad I got to play! I used both the Stitches and Swirls and Wet Paint stamp sets. I used gold ink and clear embossing powder, but the gold didn't seem to photograph too well, sorry!


Happy hopping!

HAPPY SUMMER / RS #129...


Silly me, waiting so long to post this week's card for RetroSketches! It's a very simple sketch this week, and I decided to shrink it down a little. I used this cute set, Happy Summer from Lawn Fawn, and worked in a little picnic~y paper piecing!


Thanks for stopping by!


8.22.2014

THANKS A BUNCH / ADFD Showcase & Ch#103...


 Hello!!! I have a fun card for the new challenge over at A Day For Daisies' blog, using this colorful palette. I decided to use this sweet image, Fancy Carrots, since I could easily come up with a sentiment for it - LOL! Be sure to check out the blog, grab the freebie and play along with us!


Have an awesome day!

8.21.2014

WHEN YOU'RE GONE / DS #165...


Happy Thursday!!! I say "happy", but the kids gave me their head cold, so I am really a stuffed up, feverish mess - wearing a sweater in August and bundled under blankets for the last couple days. However, I did stop shivering long enough to throw a card together, since we have a wonderful new sketch for you today from The Deconstructed Sketch! I used the set Love Birds from Papertrey Ink.


Be sure to to play along and check out all the other ladies wonderful inspiration this week! 


Have an amazing day!

8.19.2014

HELLO / CQC #255 & a CASE File...


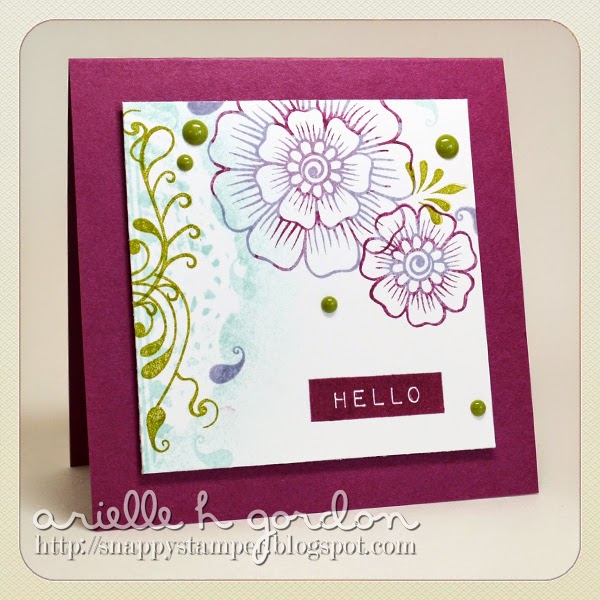
Hello! Happy Tuesday! This week's colourQ is gorgeous, and not colors I normally play with! I used my fave sets from Altenew - Hennah Elements and Label Love for this little card, and it's all one layer - imagine that! I used a doily for the left side as a mask for the Soft Sky color.


This card is also a new CASE File, just a personal little challenge where I CASE a card I've seen and loved! I just had to CASE Rosemary's cool card when I saw it!!! Don't you love it? Thanks so much for the inspiration Rosemary!


Have an awesome afternoon!


8.18.2014

DECOUPAGED MONOGRAM Hybrid Tutorial for Deena Rutter...


Hello! I wanted to share an easy project and tutorial for this sweet Decoupaged Monogram that I created for Deena Rutter's blog, using some of her gorgeous digital papers and elements. We are doing a Back-To-School series each Monday this month, so be sure to head over to her blog and check out some of the other amazing projects!

This monogram is seriously easy, but looks fabulous and makes an amazing gift!

SUPPLIES:
  • Your digital kits – I used Deena’s Roots and Wings Full Kit 
  • Chipboard or papier-mâché letter
  • Adhesive, I used Modge Podge and glue dots
  • Buttons
  • Scissors and/or a craft knife
  • Sanding tools
  • Ribbon (if you want to hang it)


DIRECTIONS:
Step 1 – Set up your pages of papers and elements and print. I printed the strips of digital patterned paper onto regular copy paper and the elements onto thick card stock. Cut your strips and have them ready to use.
Step 2 – Brush Modge Podge onto the front of the letter and add the paper strips, overlapping them slightly.
Step 3 – Once dry, flip the letter over and trim. You can neaten up the edges with sanding tools.  (At this point I brushed Modge Podge to the papers on the front of the letter to make it shiny and more durable.)

Step 4 – Decorate with your elements and buttons. You can also tie ribbon to the top to hang it.


Bye for now,


LinkWithin

Related Posts with Thumbnails