

Hello! Here's a hybrid tutorial I posted over at Pixels and Company today. I love little “artsy” things, especially little canvases. I have a tutorial today that will show you how to make this little quilted canvas wall decor. It would make such a cute little gift, don’t you think?
What you’ll need…
- Digital kit & print outs – I used a kit from KimB’s Designs, Best Medecine
- Square punch 7/8″ of thick card stock (to use as a template)
- Circle punch 1 1/4″
- 4×4″ canvas
- Buttons or other embellishments
- Modge Podge
- paint brushes and paint (optional)
- washi tape (optional)

Step 1 – Set up your digital prints. I set up a document of my patterned papers in long strips, at least 2 1/8″. I set up an identical page with solid colors, the printed one of each back-to-back. That way my circles would be solid on one side and patterned on the other. I also set up and printed a sentiment and coordinating strip of patterned paper, about 2 1/2 long.
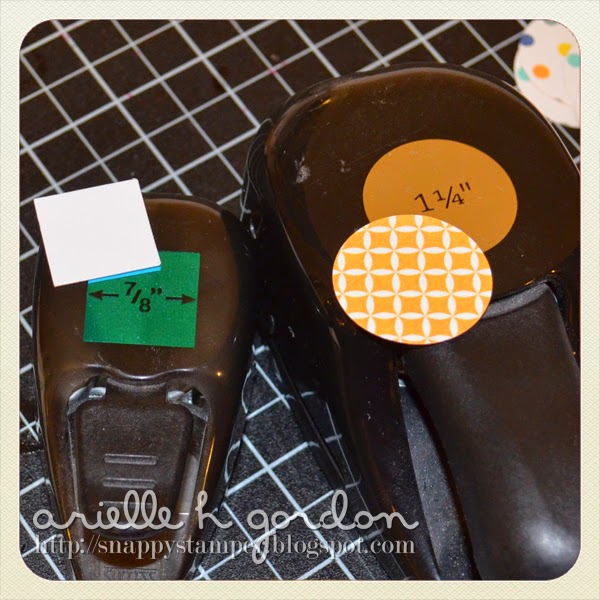

Step 2 – Punch a piece of heavy card stock with the square 7/8″ punch. You will use this as a template to fold your circles. You will need to punch out 13 circles.
Step 3 – Place the square template into the center of each circle and fold the edges over.

Step 4 – Arrange the squares prior to adhering them to you canvas. As you’ll notice, I painted the top of my canvas yellow, but left the sides unpainted. In arranging your squares, remember to plan in a space of 3 consecutive squares, to add your sentiment.
Step 5 – Apply Modge Podge to the back of each square and adhere to the canvas. I adhere the first square to the top left corner, flush with the top and left side. Then I apply the the one assigned to the top right corner, flush with the top and right side. Once they are in place, I can add the middle 2, making sure to space them appropriately. Then adhere the rest.


Step 6 - Apply your sentiment to the empty space and add buttons or other embellishments.
Step 7 - You can see I finished the side with color-coordinating washi tape.

And that’s it – a fun little wall canvas! If you make one of your own, please add a photo of it to the hybrid gallery over at Pixels and Company, and come back and leave a link in the comments – I would love to see it!
Have a great day,

What a fab idea, I love it, so colourful and eye catching :)
ReplyDelete